I recently wrote a tutorial on connecting Claude and Gemini to Xcode, but the process required a clunky workaround to get the APIs to line up correctly. That process got me wondering: what if I could connect Xcode to an LLM running directly on my own machine? I’d already been using Ollama as a private ChatGPT alternative, following a co-worker’s presentation (thanks, Sharky!) that first sent me down this whole AI rabbit hole, so it was the perfect candidate.
I knew from using its API in some n8n automations that Ollama had a local chat endpoint, so my first thought was that I’d need a tool like Proxyman to inspect the traffic and force the connection to work. Nope. It turns out, none of that was necessary. Apple made it incredibly simple to set up, providing a direct option for locally hosted models.
My Experience with Local Models
With the recent release of the Qwen3 models, the quality is actually pretty good. I’ve been chatting with them regularly, and while they aren’t quite as powerful as GPT-4o, or Gemini 2.5-Pro, they are extremely serviceable. I’m surprised at how smoothly a capable model runs on my personal M1 MacBook Pro. It’s more than enough for brainstorming, boilerplate code, and quick questions.
How to Connect Ollama to Xcode
Here’s the straightforward process to get it running.
Step 1: Install and Verify Ollama
First, you need to have Ollama installed and running on your Mac. If you don’t, head over to the Ollama website and follow their installation instructions.
Once it’s installed, you’ll want to pull a model. I’ve had good results with Qwen3. You can pull it with this terminal command:
|
1 |
ollama run qwen3:32b |
After the download is complete, you can verify which models you have installed by running:
|
1 |
ollama list |
You should see qwen3:32b in the list. Make sure the Ollama application is running in the background.

Step 2: Configure Xcode
Now, let’s tell Xcode where to find our local model.
- Go to Xcode → Settings.
- Select the Intelligence tab.
- Select “Add Model Provider…”
- In the configuration sheet that appears, enter the following details:
- Port: 11434
- Description: Give it a name you’ll recognize, like Ollama or Local Models.
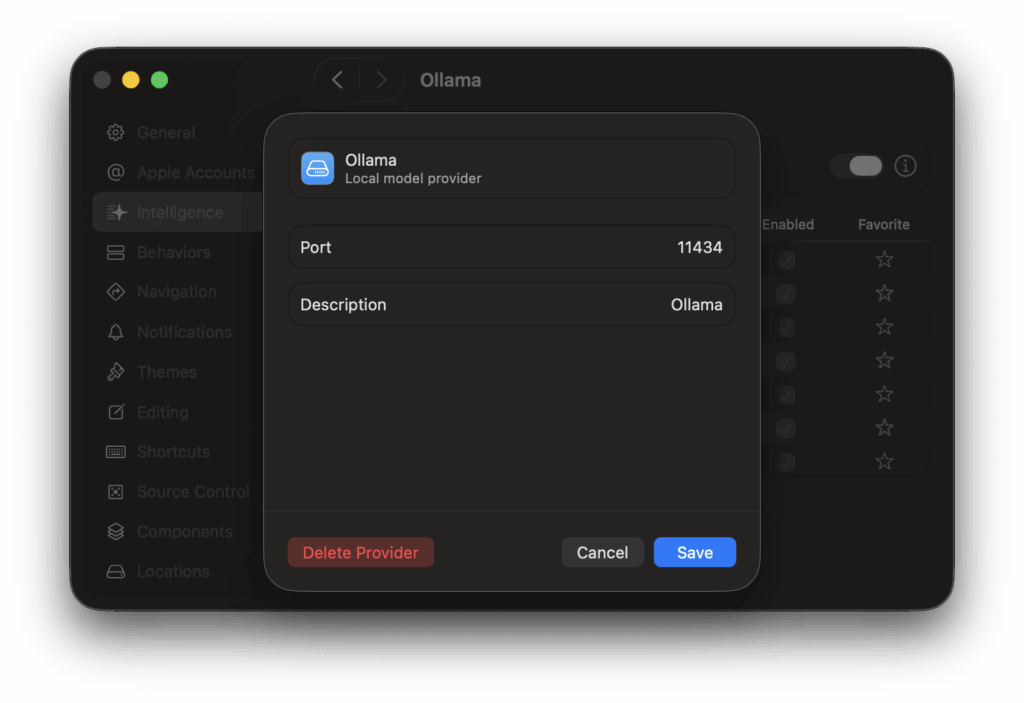
(If the models don’t load right away, you may need to restart Xcode.)
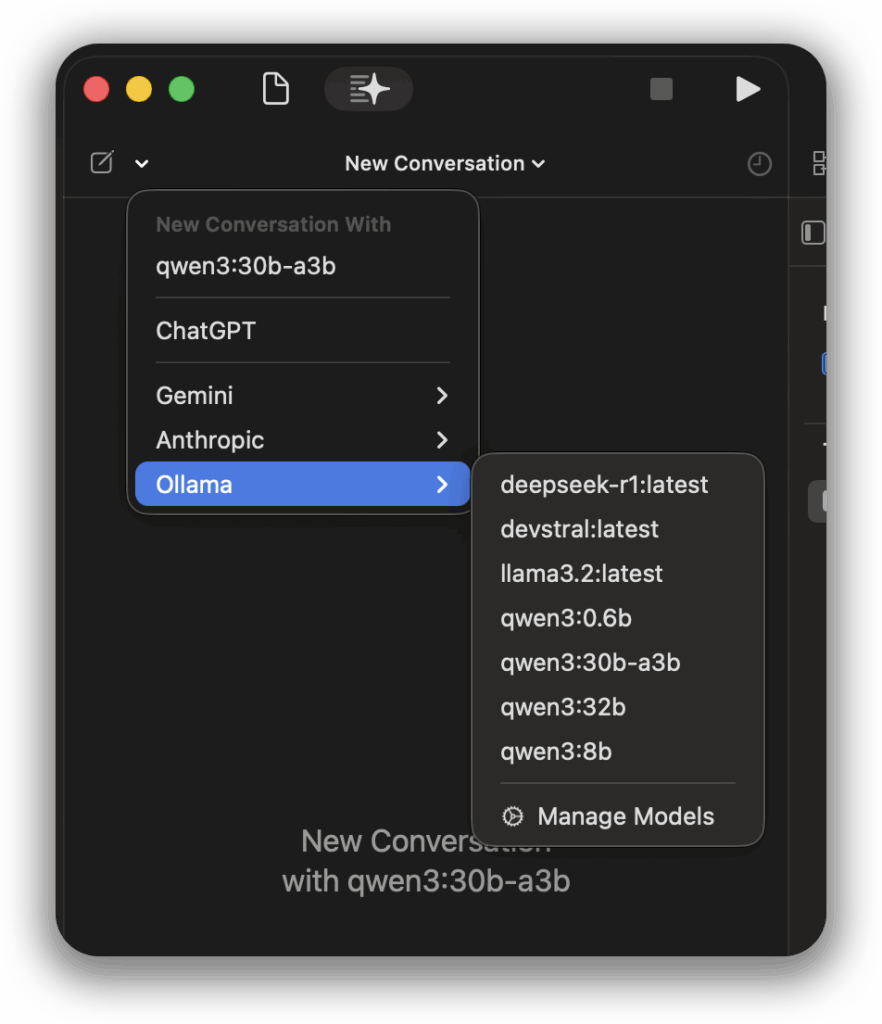
Now, when you open the Xcode coding assistant (either in the side panel or by highlighting code and right-clicking), you’ll be able to click on the model selector. Your local Ollama models should now appear in the list! Select the one you want to use, and you’re ready to go. The chat works just the same as if you were using any of the officially supported cloud services.
While I couldn’t get the local models to support file attachments, they seamlessly reference project files and Swift types directly from the codebase.
Looking Ahead
So, is this setup ready to replace your cloud-based AI assistant? For heavy-duty tasks, definitely not. While a model running on my MacBook Pro can generate adequate Swift code, it can’t match the raw power of massive models on dedicated infrastructure. However, what this setup offers today is an excellent sandbox to experiment with local AI integration, understand how these models behave firsthand, and build entirely self-contained workflows.
While the performance gap with the cloud may never truly close, advancements in open-source models and consumer hardware will continue to make local AI increasingly sufficient for our everyday needs. Getting familiar with the process now feels like a solid head start for what’s likely to become a standard part of our workflow down the road.